Tuesday, November 13, 2012

PIC16F1503 based MPPT controller for photovoltanic system


Once I found a really simple MPPT circuit on Chris' website: http://www.freewebs.com/acselectronics/buildppt.html I decided to build something inspired by his work. I always wanted to build a switching regulator based on a general purpose simple (and cheap!) microcontroller instead of specialized switching controller. I choose PIC16F1503 because it has got build in two comparators, PWM (maybe not very sophisticated but fully functional) and CWG - new peripheral from Microchip which can be used to generate dead-band time between two outputs.
My first goal was to build something as “prove of concept” so it is not a real MPPT controller because it doesn't measure a PV cell current, but it adjusts load of the PV cell to make sure it works with given output voltage. Here is circuit diagram:
It's actually simple step-down converter with P-channel MOSFET (I decided to use P-channel because it allows use of common ground to measure input and output voltage). Load of this circuit will be a lead-acid battery so I added D3 to make sure that circuit will not discharge battery. D3 introduces lose of efficiency so right now I'm thinking about other fancy circuit which will do that better (with lower voltage loss across itself).
Here is an idea how microcontroller is configured to control switching regulator with its peripherals:
This is straight-forward implementation of switching regulator but implemented in a microcontroller, after initialization of FVR (Fixed Voltage Reference), PWM, comparator and CWG (complementary waveform generator) it works and software can do something else. And it will do: I plan to implement perturb and observe algorithm to search for maximum power condition of PV cell. I plan to introduce some changes to Circuit: I have to add PV cell current measurement. I also have to add another PWM with RC filter as a source of voltage of comparator. PIC16F1503 allows me to use a DAC output as a input signal for comparator but DAC is 5-bit only, it is to small resolution for effective MPPT tracking.
Another improvement will be second MOSFET instead of D4 to increase efficiency. Due to a simplicity of MOSFET driver circuit off-time is longer than I want so I will search for some improvement, maybe totem-pole circuit?

Here is a waveform on pin 6 of microcontroller (channel 2) and gate of MOSFET (channel 1), it is clearly visible that there is much to improve, especially switch-off time.  


Here is picture of a circuit itself during early tests:
It's built on one-side substrate to minimize costs, why should I order PCB in a fab if I know that circuit will anyway need changes?

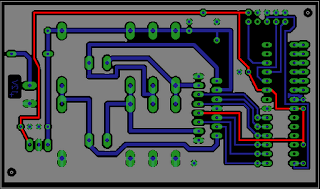
Here is PCB design, as usually I have to show off how nice PCBs I draw. I used SMD components wherever it was convenient. I even managed to design whole PCB on one layer without a single wire-bridge.  
I will update this post or I will write the new one when I will build next version of this circuit with mentioned improvements.


The software "as it is"

#include <pic.h>

__CONFIG(FOSC_INTOSC & WDTE_OFF & PWRTE_ON & MCLRE_ON & CP_OFF);


void main(void)
{
    OSCCONbits.IRCF=13; //4MHz

    ANSELA &= ~(1<<2);
    TRISA &= ~(1<<2);   //konfigurj LEDa
    PORTA &= ~(1<<2);   //zgas LEDa


    PWM1CON=0;
    PR2=9;           //40 us
    PWM1DCH=7;
    PWM1DCL=1<<7;


    TMR2IF=0;
    T2CONbits.T2CKPS=1; //prescaler /4
    T2CONbits.TMR2ON=1;
    PWM1CONbits.PWM1OE=1;
    PWM1CONbits.PWM1EN=1;
    TRISC &= ~(1<<5);


    FVRCONbits.CDAFVR=1; //4.096V
    FVRCONbits.FVREN=1;  //enable


    ANSELA |= (1<<7);    //comparator
    TRISC |= (1<<3);
    CM1CON1bits.C1PCH=2; //positive input to FVR (1.024V)
    CM1CON1bits.C1NCH=3; //ngative input to C2IN3-
    CM1CON0bits.C1ON=1; //on


    TRISC &= ~(1<<4);  //konfiguruj wyjscie do sterowania mosfetem
    PORTC &= ~(1<<4);
    CWG1CON0bits.G1EN=1;    //wlacz
    CWG1CON0bits.G1OEB=1;   //w?acz wyjscie
    CWG1CON0bits.G1POLB=1;  //inwersja na wyjsciu
    CWG1CON1bits.G1ASDLB=2; //zero w auto shot down
    CWG1CON1bits.G1IS=2;    //na wejsciu jest PWM
    CWG1CON2bits.G1ARSEN=1; //auto restart enabled
    CWG1CON2bits.G1ASDSC1=1; // comparator 1 

    while(1)
    {

        
        if(CMOUTbits.MC1OUT)
            PORTA |= (1<<2);  //wlacz leda
        else
            PORTA &= ~(1<<2); //zgas LEDa
    }
}


Tuesday, November 6, 2012

How to fix Mercedes W201 180 fuel pump controller (so called relay)


A fuel pomp relay switches fuel pump for a definite time (usually about 2 seconds) after the ignition have been switched on to make sure that pressure in fuel system is high enough. This can be easily heard as you are starting your car. The relay also detects crankshafts rotations by monitoring signal from primary winding of a ignition coil, so when you turn on a starter the fuel pomp is immediately switch on stays on as long as the engine is running. Here is PCB of that “relay”:
  And here is a closeup of tracks which conducts fuel pump current, I marked this particular two tracks:
Here is solution for the mentioned problem:
I don't know if the same problem occurs in other relay types but i suggest trying to fix it before you buy another one. If the layout of other relay is similar to this it can and it will cause a similar problem. If you have problem with starting your Mercedes you can check if it's a matter of fuel pomp switch by connecting terminals 30 and 87, you can even leave it that way but I wouldn't recommend this solution. In case of an accident - when engine is stopped fuel pomp should be also stopped to prevent fuel leak, if you will “short connect” fuel pomp - it will not.

Thursday, November 1, 2012

SMS 7-bit encoding doubts in Open AT


Right now I'm writing some software for Sierra Wireless GSM Module - Q2687. This application is written with open AT library supported by GSM module vendor and have to handle special characters in SMS messages. I've set text mode for receiving SMS and started sending messages containing characters from basic characters set extension (see GSM 03.38). I was expecting to receive special character encoded according to this table:
It turns out that this characters are encoded completely different. Neither ESCAPE TO EXTENSION TABLE nor that second byte is like in presented table. I found out that encoding is rather like this:

Hex Dec Character name Character
0x20 32 ESCAPE TO EXTENSION TABLE

0x2020 32 32 CIRCUMLFLEX ACCENT ^
0x2028 32 40 LEFT CURLY BRACKET {
0x2029 32 41 RIGHT CURLY BRACKET }
0x202F 32 47 BACKSLASH \
0x203C 32 60 LEFT SQUARE BRACKET [
0x203D 32 61 TILDE ~
0x203E 32 62 RIGHT SQUARE BRACKET ]
0x20AD 32173 VERTICAL BAR |

As you can see - something is definitely not the way it should be. Look at VERTICAL BAR encoding - it isn't event coded on 7 bit characters, so what encoding it is? I don't know yet but I have to simply implement conversion (which is quite easy to code) before I will treat received SMS with cstring functions.
I tested this situation with messages sent with Android-based mobile as also with plain old Nokia C1.

If you are familiar with Open AT you can test it on your own:

void SmsCtrlHandler(u8 Event, u16 Nb)
{

}

bool SmsMessageHandler(ascii * SmsTel, ascii * SmsTimeOrLength, asii * SmsText)
{
u16 i=0;

while(i<strlen(SmsText))
TRACE((1,”SmsText[%d]=0x%X”, i, SmsText[i])); //display received message byte by byte
return FALSE;
}

s8 smsHandler;
smsHandler = ald_smsSubscribe(SmsMessageHandler, SmsCtrlHandler, ADL_SMS_MODE_TEXT);


Monday, October 22, 2012

How much can DRL lights improve fuel consumption?


Lets say that DRL lights power consumption is about
PDRL = 10[W].
Alternatively you can drive with “normal” lights on, that is: a front low beam + rear position lamps and registration plate lamps (in my case H7, R5W, W5W respectively)
PNORM=2*55+2*5+2*5[W] = 130 [W],
we have omitted dashboard back-light but it shouldn't introduce too much error.
Volume of fuel V with energy density Ed needed to supply power P in time t is given by
where ηtotal is total efficiency.
Distance S is:
S = vt
where v is speed. We can also write:
lets insert t in the first fraction and we get:
Efficiency ηtotal is product of a engine efficiency ηengine, and a belt and alternator efficiency ηbalt
If we want to calculate the volume fuel difference we should insert power difference into formula so:
Lets assume that belt and alternator efficiency is
ηbalt = 50%.
In case of diesel engine
Ed = 37.3[MJ/ltr]
let also assume peek diesel engine efficiency
ηengine = 40%
The table shows fuel consumption at different speeds calculated according to presented assumptions calculated with formula (*)

In case of petroleum engine

Ed = 34.0[MJ/ltr]
and peek engine efficiency about
ηengine = 30%.
In real life we can expect much lower engine efficiency, depending on various conditions you can expect larger numbers, it is larger fuel savings. 

Wednesday, October 17, 2012

Profiling energy usage in a household


Energy consumption in my parents house is about 300 kWh per month. We have replaced incandescent light bulbs couple of years from now and we are systematically replacing fluorescent lamps with LED lamps because they consume even less power that fluorescent. We are moving toward energy-saving technologies. We are using solar water heater instead of electric boiler and whole house is equipped with improved thermal insulation. We live in central Europe so in winter it is nothing exceptional when you see -20 Celsius degrees (-4 Fahrenheit).

Yesterday I did a little experiment. When everybody was sleeping I switched off freezer, all computers and TVs, by switching off I mean pulling a plug from a socket. I was wondering how much current do consume devices which are switched on all the time, this devices are:
-microwave oven with nice shiny LED clock display
-conventional electric oven with another shiny LED clock display
-wi-fi router and power-over-ethernet power supply
-amplifier for a TV aerial
-electric stove (it was of course on idle)
-vent hood in a kitchen

We use an old plain electricity meter without digital display so to make total current consumption I had to use stopwatch to measure how much time does it take for a wheel inside the meter to make a whole turn. It was 312 seconds. Considering that 120 turns correspond to a 1kWh I calculated that a total idle power consumption of mentioned devices was around 96W. That is much energy. 96W 24/7 is around 70kWh per month. Idling devices are responsible for a 23% of power on a electricity bill.


Yeah, now I simply have to find out which devices are responsible for a most of this 23% and simply switch them off as often as possible. This devices:
-wi-fi router and power-over-ethernet power supply
-amplifier for a TV aerial
are on an attic and they are not_so_easy_accessible, so to ease my experiments I used a remote controller to switch them off without going to the attic. When I will repeat whole house idle consumption measurement with couple of devices switched off I will easily find power consumption of this two first suspects. I took a look inside the remote receiver, it has got transformerless power supply and it consumes about 1/2W so it will not introduce considerable errors to my measurements.

Friday, September 21, 2012

DRLv2 light controller

What does it actually do?


It constantly measures the car battery voltage and based on the voltage level it knows if the engine is running or not. When engine is running it switches DRL lights on. Depending on the selected operation mode it simply switches DRLs on and off  or it dims up and down. It also monitors state of low-beam light and turn indicator to perform some other nice things.

When engine is switched on (car battery voltage is above 13.5V):
-switches DRL off when it detects that low-beam lights are on
-switched DRL on when it detectd that low-beam lights are off so car battery will last for a longer time if you left it for a while.

When engine is switched off (car battery voltage is below 13.0V):
-switches DRL on for a 30 seconds when it detects that car have been just locked or unlocked. It simply detects one or couple of blinks which are usually emitted when you lock or unlock your car with remote controller. This function is something like “follow me home” lights, DRLs consume so little power that it's not a problem to switch them on for such a short time.
-when DRLs are already on and circuit will detect that car has been again locked or unlocked it will switch DRLs off. So you can use your remote to switch DRLs on and off when your car is parked

-detects emergency lights being switched on – in such case it will ignore blinking turn signals and will keep DRL lights off.

Car battery monitoring serves as protection against deep discharge in case of alternator failure. It also switches DRLs on after the engine has started. It doesn't consume power at that exact moment when engine starter works so it eases start-up.

Whole circuit in stand-by consumes less than 1.5mA, it would take about 2 years to discharge a typical car battery with this current. It is protected against wrong polarity and thanks to fuse it is protected against DRL short circuit. It can control DRLs up to 30Wats, witch in case of LED DRLs is far enough.  


Why did I build it?
My car wasn't factory fitted with day running lights. In my country it is legal obligation to always drive with day running lights or with low-beam lights on. I once calculated that low-beam lights which consume more that 110Wats increase fuel consumption by around 0.25 l/100km (approximately 1,5 mpg US). I can prove it using a pencil and a sheet of paper. LED DRL consumes about 10Wats. According to EU law DRL lights should be automatically switched on when engine is started and they also should by switched off when low-beam lights are switched on. This automation is usually done by a simple relay connected to low-beam light and a wire which is connected to +12V simultaneously with turning on ignition. Using relay, although it's simple, has got disadvantages. Typical relay-based controller unnecessary drains car battery when engine is starting, it also needs to be connected to wire which is connected to battery positive terminal simultaneously with ignition. In my car it is not so easy access such a wire. I noticed that cars battery is quite easy accessible and project has started. I draw a simple circuit mentioned in one of my previous posts, I designed PCB keeping in mind that it have to fit to a typical plastic housing and ordered handful of necessary components.

After two weeks of impatient waiting I finally received 12 brand new PCBs for my Day Runnig Light controller. They fit to plastic housing which I had bought earlier. Looks like they will be ready for testing in a next week.

I have mounted 4 pieces so far – that's enough for development purposes:


PCBs are sealed with epoxy to make sure that they will survive dust, moisture and wide range of temperatures. On the picture below I marked pin order.

How to connect it?

Connections which you have to make are marked with colors, connections which are already in your car are marked with black.

Sometimes there are issues with particular DRL lights which don't like dimming, this controller can work in two modes: with or without dimming. When it works without dimming it does exactly the same thing but it adds some extra delays instead of dimm-up and dimm-down periods. There is no switch to choose whether it does dimming or not. Instead of some potentially unreliable switch it uses tricky technique: it learns which input is connected to low-beam light.
If low-beam light is on INPUT1 (and consequently turn indicator on INPUT2) DRLv2 works with dimming. If you swap it and connect low-beam light to INPUT2 it will work without dimming.
Controller learns on which input there are short pulses (turn indicator) and on which there is constant positive state (low-beam). After installing controller into your car you should switch low-beam lights for let's say 5 seconds or longer so it can learn that this is low-beam input and choose desired mode.


Thursday, September 20, 2012

Digital camera remote control


One of my friends wanted a microcontroller to send commands to a digital camera. There are lots of such projects on the web and there is even more cheap Chinese remote controllers but no remote does exactly what my buddy needed. He already had a hardware which I mentioned in previous post and a regular remote controller for his Olympus camera. First of all we had to generate 36KHz carrier frequency, we did it using Timer1 in CTC mode:

PORTB &= ~(1<<1);   //there is 0 on pin when OC1A is disabled
DDRB   |= (1<<1);   //OC1A pin works as output
TCCR1B |= (1<<WGM12) | (1<<CS10); //CTC mode and clock source selection
TCNT1 = 0;   //clear timer register
OCR1A = 14;   //1MHz/(2*36KHz) ~ 14
//TCCR1A |= (1<<COM1A0);   //enables OC1A output

Then we had to key carrier frequency with data which will convince camera to take a picture. Information sources we used were lirc drivers www.lirc.org and signals received from regular controller. Every bit consists from two consecutive states zero and one, meaning of a bit is encoded in length of the second state. This way transmission is immune against clock desynchronization. Data transmitted by remote controller which we reverse-engineered looks like this:  
It turned out that camera needs only that marked with red box part of a signal. Rest of transmission is redundant in case of that specific camera. Setting and clearing COMA10 bit controls whether carrier frequency is supplied to IR LED or not, we wrote simple preprocessor directives:

#define HEADER TCCR1A |= (1 << COM1A0); _delay_us(8853); TCCR1A &= ~(1 << COM1A0); _delay_us(4489);
#define ONE TCCR1A |= (1 << COM1A0); _delay_us(559); TCCR1A &= ~(1 << COM1A0); _delay_us(1670);
#define ZERO TCCR1A |= (1 << COM1A0); _delay_us(559); TCCR1A &= ~(1 << COM1A0);  _delay_us(555);  

And function sends a “take a picture” command to camera:

HEADER;
ZERO;ONE;ONE;ZERO;ZERO;ZERO;ZERO;ONE;ONE;ONE;ZERO;ONE;ONE;ONE;ZERO;ZERO;ONE;ZERO;ZERO;ZERO;ZERO;ZERO;ZERO;ZERO;ZERO;ONE;ONE;ONE;ONE;ONE;ONE;ONE;ONE;

Now when we knew that it works we'll clean up this code to make it non-blocking, neat and easy to read and maintain. The most important thing is that controlling digital camera is not_so_difficult_as_you_thought.  


Wednesday, September 12, 2012

Lambda sensor based Air-fuel ratio indicator [AFR] 1

Once I bought a new car with a fuel injection I started to think how to improve my fuel efficiency. I know that engine breaking is efficient, I also sometimes tried to explain this technic to my mates. To help myself I designed little circuit which "steals" voltage from lambda sensor and uses two-color LED to show you if drive efficiently or not. (to show if engine runs on lean, stoichiometric or rich mixture)


What does it do?
When you drive in a steady conditions, engine warm, no strong acceleration engine computer controls amount of fuel to produce clean exhaust, this can be observed on voltage from lambda sensor as values ranging from 200mV to 800mV

In such case this circuit will light both colors of LED producing yellow light as a information for driver that everything is normal, AFR is close o to 1.
When you do engine braking - it means release gas pedal engine computer will stop fuel flow - engine does not consume fuel, it can be observed as voltage from lambda sensor close to 0V. Presented circuit will light up green LED to show you how clean and cheap you driving is at that moment.
Right after turning on cold engine and when you try to accelerate quick engine computer will let some extra fuel to pistons - your car consumes much more fuel than in cruising conditions. This device will light up red LED to warn you that you should expect huge fuel consumption.


How does it work?
Lambda sensor is connected to engine controll unit like this:
Signal from this sensor informs engine controll unit about mixture richness, I decided to measure this signal like this:

I did some measurements with my good old Tektronix scope just to makse sure that theory of lamba sensor applies to my car and than I draw something like this:
On the left side is a main connector, two terminals are connected to lambda sensor and other two to +12V and to ground. Signal from lambda sensor is fed to differential amplifier IC3A. This might seem to be not necesary because most of lambda sensors have got grounded terminal. But I wasn't certain if my ECU does it. I also didn't want to damage ECU or sensor when I tinker with this vital signal in my car so I used differential amplifier as separation stage. +12V is regulated by good old-fashined 78L05 to supply microcontroler. I used PIC12F510, mostly because of its low price. Two colour LED is conntroled by microcontroller.

How to build one?
I draw a small one-sided printed circuit board for all components, this is a result:
minimalistic, isn't it?


Tuesday, September 11, 2012

How to find a short circuit on your PCB

My friend has fabricated PCB for his stepper motor controler. He etched and soldered that board at home but due to lack of soldermask there was short circuit between VCC rail and ground. We knew for sure that there was no short circuit in a design so it had to be a drop of solder in a wrong place. We could do two things:
1. visualy inspect VCC and GND rails on the PCB
2. use Ohm's law
Visual inspection might be not so easy, have you heard about tin whiskers? http://www.eetimes.com/electronics-news/4234309/Toyota-accelerations-revisited-hanging-by-a--tin--whisker visual inspection is hard and not cool. I decided to use mighty Ohm's law. Presented circuit was designed to by supplied from 5V and all components were already placed so we had to bear in mind that voltage. I set desktop power supply for 5V, current limit for 3A and connected to PCB. Current limit worked and voltage measured across GND and VCC rails was about 0.3V - circuit was shorted.
I marked VCC with red and GND with grey. Short circuit was somwhere between this marked rails. I connected PCB to the power supply like this:
Before I started to measure voltage across PCB tracks I did simple calculation just to know what voltage to expect. I knew that copper on the PCB was 35um thick and that VCC track widht was about 1mm. 1A flowing throug such track should cause voltage drop according to resistance of track. In this case 15mV/cm so values which are easily measured even with cheap chinese multimeter. First I connected multimere like this:

Measured value was close to zero so I came to conclusion that current is not flowing throug track A. I connected multimeter like this:
Measured voltage of 0.075V indicated that 3A short circuit current flows through track B. I moved a tip of multimeter further:

Measured voltage increased so I knew that current flowed through part C of track. Repeating that procedure I found drop of tin at the left-most end of track C. That's easy: you are moving one tip of a multimeter and measure voltage across track, if voltage increases - that means that tip of a probe is getting closer to short circuit point. This method is easily extendable and can be used in much more complicated PCBs. I never found it in a handbook so I decided to desribe it and share here. Hope it will help you one day.


Here is real view of a mentioned PCB:

Friday, September 7, 2012

GSM module power supply testing

Most GSM modules that I know need supply voltage in range 3.4 to 4.5[V] with voltage ripples less than 400[mV]. The main issue in designing such a power supply is that it has to maintain correct voltage even during voice call and data transmission. Not going into details current consumption during transmission looks like this:
So you see that surge current pulse takes 577[us] and is followed by about 4 [ms] of "pause". Burst current can reach 2A. I encountered problem with supplying GSM modules couple of times, sometimes clues you get from GSM module which is weakly supplied are really strange, for example Q2687 from Sierra Wireless won't reset when voltage is to low but it won't register to network, either.  Not to make that mistake again I decided to design a tiny little circuit to test voltage regulators designed for GSM modules.
It is as simple as possible - voltage from tested power supply is connected to X1-2 (+) and X1-1 (ground). Q1 MOSFET keys current which depends on supply voltage and value of R1. R1 is big, wire-wound resistor with power rating of 5W. Assuming that circuit is supplied from 4V and not taking into consideration resistance of opened MOSFET surge current should be about 2[A], when Q1 is switched off whole circuit consumes less than 1[mA] to power up PIC microcontroller. D1 diode prevents C1 from draining through R1, thanks to this diode and C1 microcontroller should work even during huge voltage dropouts across X1 terminals. I also added LED1 just to show that circuit is still up and running. You could also use GSM module to generate such distinct power consumption pattern but to do so you have to force module start GPRS session or to make voice call which seems to be impractical, I preffer to have such circuit so I can see both current and voltage on my ocillocope, analize voltage regulator response and do long-term tests under such load.
PCB project looks like this:


and as you can see - it is designed using only one signal side, that way I can make this PCB at home using well knonw method presented here http://www.riccibitti.com/pcb/pcb.htm


Channel 1 below is current measured with a 0.1Ohm resistor and channel 2 is voltage supplied to the real GSM module. Chanel 2 (voltage) had to be inverted because my oscilloscope doesn't have galvanically separated channels. It's easy o calculate that peak power consumption reaches 8W, when we consider low duty cycle average power is less than 2W but duration of peak is rather long - 595us, it's not that easy to store that amount of energy in filtering capacitors .


Wednesday, September 5, 2012

Światło rowerowe 1

W oczekiwaniu na nową wersję płyty drukowanej do DRL postanowiłem zacząć nowy lekki temat - lampkę rowerową tylną. Lampka ma mieć następujące funkcje:

  • Ładowanie kabelkiem micro-USB, w środku lampki jest bateria Li-Ion, jeżeli dopasuję obudowę to będzie to bateria BL-5C tania lubiana i znana z produktów firmy NOKIA
  • Przetwornica step-up do zasilania kilku LED'ów, ze względu na odprowadzenie ciepła zdecydowałem się na więcej LEDów o mniejszej mocy niż na jednego potwornie mocnego LEDa, plan jest taki żeby korzystając z not aplikacyjnych microchipa zrobić przetwornicę na bazie mikrokontrolera bez dedykowanego sterownika http://ww1.microchip.com/downloads/en/appnotes/01047a.pdf
  • Sygnalizacja dźwiękowa - przetwornik piezzo będzie informował o włączeniu, wyłączeniu i o rozładowaniu baterii. 
  • Touch-sensor zamiast włącznika mechanicznego - dzięki braku elementów mechanicznych ma być taniej i co ważne - szczelnie, hermetycznie szczelnie (czy to nie kłóci się z wystawienie gniazdka do ładowania?)

UWAGA UWAGA a teraz gwóźdź programu: czujnik przyśpieszenia:

  • automatyczne włączanie lampki kiedy rower rusza
  • automatyczne gaszenie lampki jak już zostawisz rower pod sklepem (oczywiście poprzedzone ostrzegawczym piknięciem, nie chcemy gasić lampki kiedy rowerzysta stoi we Wrocławiu w śluzie rowerowej na placu Bema). Po wykryciu bezruchu lampka sygnalizuje zamiar wyłączenia się kilka razy, jeżeli dalej trwa bezruch - lampka rowerowa gaśnie, jeżeli rowerzysta nie chce gasić lampki to wystarczy że poruszy rowerem żeby przerwać procedurę wyłączania
  • światło stop - kiedy sensor wykryje hamowanie - zwiększona zostanie jasność, może to jest bajer a może praktycznie przydatna rzecz? zobaczymy, zaprzyjaźniony rowerzysta mówi że w ciasnym peletonie rzecz może być przydatna o ile czas reakcji będzie wystarczająco krótki

Lampka ma być ultra widoczna - przewidywana moc zastosowanych LEDów to 1...2W co przy świetle czerwonym może dać mocny rezultat. Projekt w sam raz na jesień, jeżeli masz jakieś opinie na temat funkcji projektu to pisz, każdy pomysł jest dobry i pomaga mi zaprojektować praktyczny produkt.

Target cenowy - byłoby super gdyby lampka kosztowała około 50zł. Najdroższe elementy to: mikrokontroler, sensor MEMS, diody LED, tranzystor i cewka do przetwornicy, PCB i obudowa.

Monday, August 13, 2012

Światła do jazdy dziennej 2

Trzy płyty drukowane włącznika świateł do jazdy dziennej dotarły już jakiś czas temu. Po obłożeniu elementami okazało się że popełniłem jeden błąd - w ferworze walki o rozłożenie elementów i ścieżek na jednej stronie źle podłączyłem sygnał do pomiaru napięcia zasilania. Kawałek kynaru rozwiązał problem ale jest nauczka:
W małych mikrokontrolerach może i są wejścia przetwornika analogowego ale nie są w pełni elastycznie konfigurowalne, np. w PIC12F510 jeżeli chcesz korzystać z jednego kanału przetwornika ADC to musi być kanał AN2. (Logiczne, prawda?).
Zamontowałem układ w samochodzie, po wgraniu programu wszystko ruszyło. Wnioski z użytkowania są takie:

  • Napięcie w instalacji samochodu (w tym przypadku Opel Corsa C) wynosi przy odpalonym silniku 14.2V, ale osiąga tą wartość dopiero kilka sekund po odpaleniu.
  • Regulator alternatora ma pewną bezwładność czasową - kiedy włączę jednocześnie dmuchawę (10A) i światła mijania (ponad 10A) to napięcie w instalacji spada i powrót do wartości 14.2V zajmuje około sekundę. To byłby problem gdyby nie opóźnione wyłączenie świateł do jazdy dziennej.
  • Dzięki sterowaniu świateł do jazdy dziennej na podstawie napięcia w sieci osiągnąłem (to nie był mój podstawowy cel) zabezpieczenie przed nadmiernym rozładowaniem akumulatora
  • Funkcja załączania świateł w momencie kiedy centralny zamek zamyka lub otwiera drzwi - sterownik wykrywa pojedyncze mignięcie kierunkowskazu i włącza światła, ale wykrywa również włączenie świateł awaryjnych, w takiej sytuacji światła nie zostaną załączone (w przeciwnym razie zgaszone auto z włączonymi światłami awaryjnymi zawsze miałoby włączone światła do jazdy dziennej)
Kod jest tak prosty że pozostawiłem go w jednym pliku, poniżej źródło:
#include <stdio.h>
#include <stdlib.h>
#include <htc.h>

__CONFIG(OSC_IntRC & WDT_OFF & CP_OFF & IOSCFS_OFF);

#define MINIMUM_RUNNING_VOLTAGE  (180)
#define MAXIMUM_IDLE_VOLTAGE     (168)

void main(void)
{
    char power=0;
    enum {UP, DOWN}mode;
    enum {ON, OFF}kierun;
    enum {AON, AOFF}awaryjne;
    int lans=0;
    char kierZalaczenia=0;       //ilosc zalczen kieruna w okresie czasu
    int kierOkres=0;

    kierun = OFF;
    awaryjne = AOFF;
    mode = UP;
    CM1CON0 = 0; //wylacz komparator
    OPTION = 0xC4;
    ADCON0 = (1<<7); //wejscie analogowe
    TRIS = (1<<0)|(1<<1)|(1<<2);   //wejscie analogowe

    ADCON0bits.ANS=1; //AN2 configured as analog input
    ADCON0bits.CHS=2; //wybierz do konwersji kanal 2
    ADCON0bits.ADON=1;//wlacz ADC

    while(1)
    {
        //wystaw PWM
        if(TMR0<power)
            GPIObits.GP5=1;
        else
            GPIObits.GP5=0;
        //mierz ADC
        if(GO_nDONE==0)
        {
            if(lans==0)               //normalna praca
            {
                if(ADRES<=MAXIMUM_IDLE_VOLTAGE)         //silnik zgaszony
                {
                    mode=DOWN;                   
                    if(kierun==ON && awaryjne==AOFF)
                        lans=4096;
                }
                if(ADRES>=MINIMUM_RUNNING_VOLTAGE)         //silnik w ruchu
                {
                    if(GPIO & (1<<1)) //swiatla mijania wlaczone
                        mode=DOWN;
                    else              //swiatla mijania wylaczone
                        mode=UP;
                }
            }
            else                      //tryb odmierzania lansu
            {
                mode=UP;
                if(ADRES>=MINIMUM_RUNNING_VOLTAGE)         //silnik w ruchu
                    lans=0;           //wylacz tryb lansu - wroc do normalnego sterowania
                if(awaryjne==AON)     //jezeli wlaczone awaryjne to
                    lans=0;           //wyjdz z trybu lansu
            }
            GO_nDONE=1;//wyzwol kolejna konwersje
        }
        //sprawdzaj czy wlaczone sa swiatla awaryjne
        if(kierOkres>=500)
        {
            kierOkres=0;
            if(kierZalaczenia>1)
                awaryjne=AON;
            else
                awaryjne=AOFF;
            kierZalaczenia=0;
        }
        //odmierzaj sciemnianie i rozjasnianie
        if(TMR0>=0xFA)
        {
            TMR0=0;
            if(mode==UP && power<0xFF)
                power++;
            if(mode==DOWN && power>0)
                power--;
            if(lans>0)  
                lans--;
            kierOkres++;      //odmierzaj okres zliczania migniec
            if(GPIO & (1<<0)) //sprawdz czy kierun jest zalaczony
            {
                if(kierun==OFF)
                    kierZalaczenia++;//inkrementuj ilosc migniec tylko na zbocze zalaczajace
                kierun=ON;                
            }
            else
                kierun=OFF;
        }
    }
}

Monday, July 23, 2012

teraterm - terminal portu COM i socketów


Namówiłem Karola żebyśmy połączyli siły i zrobili aplikację embedded z interfejsem webowym, współpraca zapowiada się znakomicie bo mamy uzupełniające się kompetencje. Karol zawodowo zajmuje się sklepami internetowymi a próbkę jego możliwości można zobaczyć tutaj http://www.autogas-lpg.pl/ . Część sprzętowa to będzie moduł GSM i mikrokontroler z całą armaturą dookoła, pisząc galanteria mam na myśli elementy zasilające, interface czy też raczej sygnalizację stanu, obudowy...
Robimy proste doświadczenia dotyczące styku pomiędzy serwerem a modułem GSM. Mamy dwóch faworytów:

  1. metoda POST/GET
  2. surowe dane przesyłane socketami

Oba sposoby mają wady i zalety. POST jest prosty do wytłumaczenia webowcom, każdy od razu wie o co chodzi i nie ma problemu z hostingiem. Problemem posta jest duży narzut na protokół, nie można po prostu przesłać bajtu do serwera bo każdą daną trzeba opakować w nagłówek POSTa, post siłą rzeczy jest tekstowy co rodzi dodatkowe problemy. Socket za to daje pełną swobodę, socket pod względem trudności obsługi po stronie modułu GSM jest porównywalny z przesyłaniem danych uartem. Można wysłać i pojedynczy 8-bitowy znak ale jest problem: Serwer musi być uruchomiony jako osobna maszyna - żaden zdrowo myślący administrator nie pozwoli wystawić otwartych socketów. Cały protokół trzeba budować od początku.
Narazie dostałem od Karola namiar na serwer który przyjmuje dane metodą POST, zanim zaimplementuję POSTy na module GSM postanowiłem przećwiczyć składnię wysyłając "recznie" składane requesty terminalem teraterm. Teraterm jest to Ferrari wśród terminali - dostarcza prosty język dzięki któremu nie trzeba klikać za każdym razem i wklejać danych do wysyłki. Teraterm jest dostępny tutaj http://logmett.com/index.php?/download/tera-term-474-freeware.html a opis języka skryptowego tutaj http://ttssh2.sourceforge.jp/manual/en/macro/index.html . Poniżej wklejam prościutki skrypt który wysyła dane metodą POST. Jak widać teraterm ma problem ze znakami końca lini, funkja sendln nie dołącza CR LF, ale można sobie z tym poradzić, liczę na to że w następnej wersji będzie lepiej.
changedir 'c:\'
logopen 'test.log' 0 1


while 1
connect 'test.someserwer.pl:80 /T=0 /LA=U'
setecho 1
send 'POST /arek01/www/add.html HTTP/1.1'
send 13
send 10
send 'Host: test.halaba.com.pl'
send 13
send 10
send 'Connection: keep-alive'
send 13
send 10
send 'Origin: http://test.halaba.com.pl'
send 13
send 10
send 'Content-Type: application/x-www-form-urlencoded'
send 13
send 10
send 'Content-Length: 26'
send 13
send 10
send 13
send 10
send 'urzadzenieId=nazwa2&data=2'
send 13
send 10
pause 2
disconnect 0


endwhile
Ważna uwaga:
/T=0
w skrypcie zmusza teraterm do otwarcia zwyklego socketa, w przeciwnym razie teraterm będzie próbował połączyć się protokołem telnet.
Składnia jest toporna ale można przywyknąć. Czas spędzony na nauce języka zwróci się co spróbuję udowodnić w jednym z kolejnych postów pokazując jak można wygodnie rozparsować odpowiedź otrzymaną przez port COM. Język skryptowy teraterm pozwala przetestować algorytm odpalając go na PC zamiast na docelowej platformie. Na sprzęcie musi działać tylko wysyłka, odbiór i interpretacja poleceń odebranych portem COM a cała "logika" zostaje zamknięta w skrypcie. Lubię teraterm w sytuacjach kiedy trzeba robić długotrwałe testy z generowaniem wydarzeń co pewne odcinki czasu - zamiast siedzieć ze stoperem w ręku przez godzinę - uruchamiam skrypt i mogę iść na kolejną obowiązkową przerwę kawową...

Friday, July 20, 2012

ImageMagick mogrify - zmniejsz tysiąc bitmap

Coś co dla programistów webowych jest standardem dla branży embedded wcale nie musi. Mój przyjaciel oprogramował sterownik z wyświetlaczem graficznym. Graficzność sterownika sprowadza się do szybkiego przemiatania bitmapami odczytanymi z karty pamięci. Zasoby mikrokontrolera są skromne dlatego nie ma czasu na finezyjne dekompresowanie w locie, wszystko co możliwe jest przygotowane wcześniej i zapisane na karcie. Graficy dostarczyli mu pliki w rozmiarze niedopasowanym do rozdzielczości wyświetlacza więc mój kolega pracowicie zmienił rozmiar grafik otwierając każdy plik w paincie w którym to robił również przycięcie i dorysowywał kilka prostych kształtów. Przygotowanie grafik dla jednej wersji językowej zajmowało ponad godzinę.
Rozwiązaniem problemu okazał się pakiet ImageMagick i program mogrify z tego pakietu. Wywołany z konsoli program potrafi przycinać, skalować, filtrować grafiki, dodawać napisy i proste kształty a nawet wstawiać grafiki w grafiki, scalać wiele plików w jeden, co najważniejsze może tę samą operację przeprowadzić na dowolnej liczbie plików, po prostu zamiast nazwy konkretnego pliku np ekran.bmp wystarczy podać mu *.bmp żeby program przerobił wszystkie pliki z folderu.
Poniżej dwie linijki ze skryptu do przerabiania grafik:
mogrify -crop 800x405+0+75 -geometry 320x162 *.bmp wycina z pliku obszar o rozmiarze 800x405 pikseli przesunięty o 75 od górnej krawędzi - odcina górny pasek o szerokości 75 pikseli a następnie zmienia rozmiar pliku na 320x162 pikseli. Ta operacja jest przeprowadzana na wszystkich plikach .bmp w folderze z którego został wywołany program mogrify.
mogrify -fill transparent -stroke red -strokewidth 1 -draw "roundRectangle 1,35 319,127 5,5" *pro1.bmp dorysowuje do pliku przezroczysty prostokąt o zaokrąglonych rogach. Krawędź tego prostokąta ma grubość 1 i kolor czerwony, współrzędne dwóch rogów to 1,35 (x1,y1) oraz 319,127(x2,y2) zaokrąglenia mają promień 5 pikseli w obu osiach. Zmiany zostają naniesione na wszystkie pliki których nazwa kończy się na pro1.bmp
Mogrify potrafi znacznie więcej, żeby przekonać się o tym pobierz (darmowy!) pakiet ImageMagick z http://www.imagemagick.org/ a następnie w konsoli (np. windowsa, ja korzystam z windowsa) wpisz mogrify żeby przejrzeć listę możliwych opcji, polecam też http://www.imagemagick.org/www/mogrify.html .